DIY Mid Century Christmas Putz Houses

Tuesday, November 28, 2017


It's that time of year again, and this year we've got some pretty sweet DIY projects headed your way. We're super excited to share this one with you– inspired by our trip to LA and Palm Springs this summer, we took the classic Christmas 'putz houses' and gave 'em a modern, mid century twist!


Now before you freak out and say, 'Gosh... you're insane for cutting and building these mini houses... get a life already!' We'll partially agree in saying there could have been a better way of spending our time than spending a day making these houses, but on the other hand– these are freaking adorable and we reject your judgement, hah!

The best part about these is that there are templates online that you can print out to make whatever style house you want. Heck, go ahead and build an entire modern little village if you're feeling up for it! (*Side note, this woman is amazing and took the time to upload a bunch of different styles, so check 'em out!)


Um, look at this adorable little A-frame. We'll be moving in in 3-2-1...

These are simple to build once you have the template. We traced and cut ours out of the backs of old cereal boxes– cardboard sturdy enough to stand up without flopping over, but not so thick that you can't cut or fold without freaking out and throwing it across the room.


Mini bottle brush trees make anything look adorable and festive AF, so we definitely planted them with every putz house. For a more modern look, get some neon-colored trees, or just stick with the classic evergreen, cause it's Christmas.


For a little extra touch, we covered the backside of the 'windows' with some tracing paper, and placed a battery operated tea light inside each house for that cozy Christmas glow.


Adorable, right?!


Of course we made a mini paper car. Gotta get places, am I right?


We can't all be lucky enough to live in Palm Springs, but at least we can pretend with these lil' putz houses. Here's to the start of another holiday season! 

Make sure you share your DIY's with us if you try them using #rayandablog– can't wait to see what you all come up with!

Good Eats - LA

Friday, September 8, 2017


Installment #2 of this little LA Travel Guide post series, and this time we're talking FOOD! Man, does LA have some killer food– TACOS of course, pizza, burgers, street food, and lots of bars (that's a stretch, but...)


Once we landed and got through our hour long fiasco at the car rental place, we headed straight to In-N-Out Burger, a West Coast must. It's fast food at it's cheapest and best. Oh, and don't forget to get your burger "animal style–" you won't regret it.


Even their disposables are cute!


After we settled into our cute Airbnb, we did some neighborhood research on food and nightlife, and decided to treat our stomachs to Pink's– one of the most famous lil' hot dog stands in the country apparently! 


Ok, so they have about a bazillion different types of hot dogs, sausages, kielbasas, even burgers if you're not into hot dogs, which, why would you even come here then? Anyway, after about 15 minutes of drooling over all the options and becoming almost too overwhelmed to make a choice, we got the classic chili dog and a Chicago Polish dog. We were NOT disappointed, but rather very full.


Just look at these big mamas!


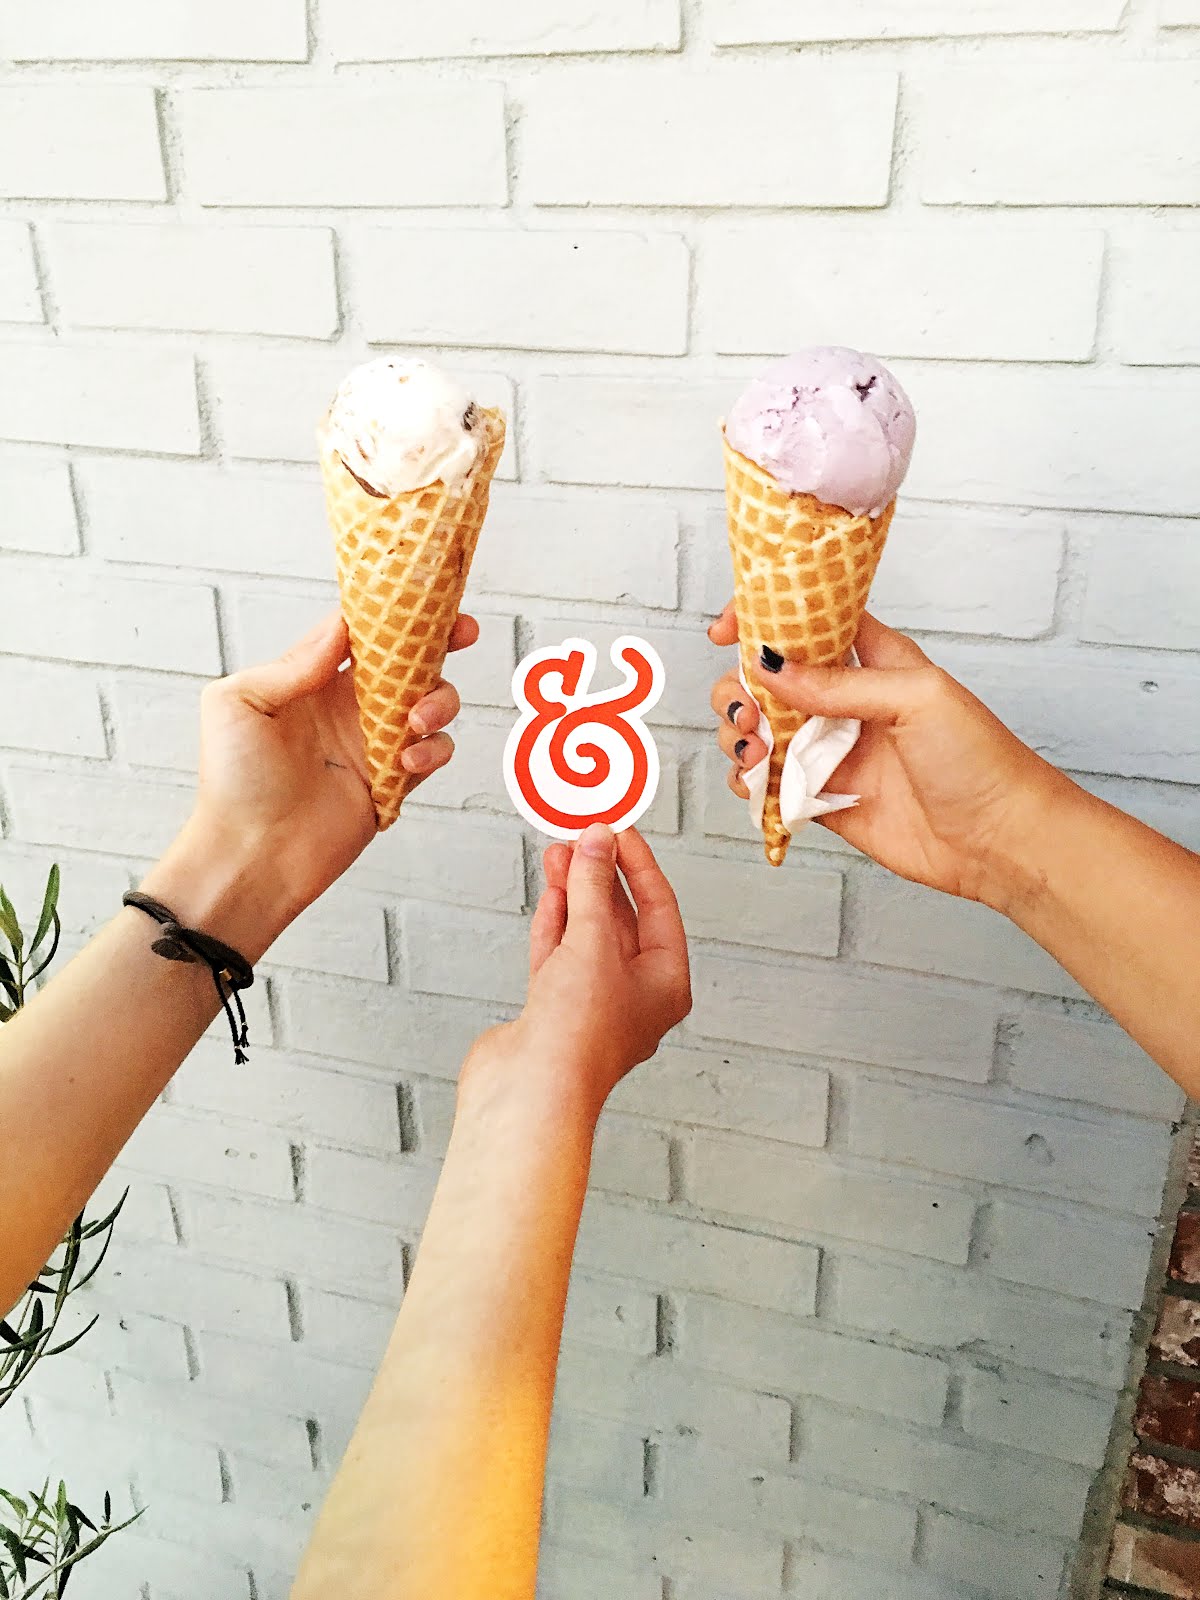
And no meal is ever complete until you finish it off with some ice cream. Luckily LA has a ton of great options, like Jeni's Splendid Ice Cream. *Disclaimer– we had ice cream every night in LA, no shame, just joy– pure, unadulterated dairy joy.


Um, who ever said presentation isn't important? THOSE LIL WAFFLE WEDGES are too stinkin' cute.


Love in a cup.


Ok, day 2 we headed out to the desert! Palm Springs and Joshua Tree National Park. We didn't think we'd have great food options in the desert, cause, well... desert. To our surprise, we found this amazing little hole-in-the-wall eatery & bar called The Joshua Tree Saloon. We were even mistaken for locals, so that just about made our day.


We didn't order anything super amazing and out of this world– just some burgers, but DANG were those sweet potato fries scrumptious! While we ate, a husband-wife duo played some killer old school rock and roll, locals popped in and out, and we realized we found the perfect little desert oasis. We'll definitely be back again some day!


Tucked inside a little alleyway along a busy street we found Alfred Tea & Coffee, and stopped in for a quick bite to eat before we headed to the beach for the day. The best part about this location is that they serve bagels from a local bakery, Yeastie Boys Bagels– genius, right? Sadly, the Yeastie Boys were not there, but their bagels were bangin'. Plus this place had such great coffee and tea that we had to come back for a second time.


After the beach we sure worked up an appetite for a late lunch. Walking back to our parking spot, we passed a little lunch spot called Lemonade which was too cute to not check out. You can basically make your own combo plate with a bunch of different options (note: everything they serve here is cold, like temperate-wise– A was totally caught off guard by this). Oh, and definitely get the lemonade if you go here. You're a fool if you don't.


Still kinda full from lunch and drinking all that dang lemonade, we decided dessert before dinner (which is always a good idea despite what anyone says). Right across from Jeni's was a Salt & Straw, which we've both never tried, and decided tonight was definitely the night.


We'd be the biggest liars if we said this wasn't staged, so it was. But we did eat our ice cream before we took this photo, so... oops. 


Instead of a real dinner, we headed to The Dresden for some drinks and appetizers for a chill night in town. It's a little bar and restaurant that still looks like it's living in the 70's– fabric table cloths, dim lights, leather rolling chairs, and the best part– Marty and Elayne, the most adorable cabaret singers and performers, who perform at the Dresden weekly! Check out some of their videos here.


Our next and final day in LA started off with a hearty breakfast at Sunset Junction Coffee Shop, and a second cup of joe next door at Intelligentsia Coffee. FYI... LA bacon is very different from East Coast bacon.


^ That's yogurt, not ice cream, ok? We're not that desperate...


Aside from the KILLER tile floors and open air seating, Intelligentsia's coffee was reallllly good!


Last but definitely not least of our ice cream stops was Churro Borough where we experienced THE Churro Ice Cream Sandwich. One honkin scoop of ice cream sandwiched between two heavenly fried churro discs. Ray went for a brown butter cookie sorbet while A chose Spanish latte ice cream. PLUS you could stop by here before going up the street to the Dresden for a little pre entertainment snack. WIN WIN.


Oh yeah... no trip to LA is ever complete without some TACOS! We stopped into one of Silver Lake's corner taco stands, Tacos Delta, and were not disappointed! LA tacos are good pretty much anywhere you go, so it's never hard to find good ones in whatever area you stay in!


Oh, and don't forget the snacks and drinks on the plane! Bacon actually stays fairly delicious even when saving it for the ride home.


I hope this post made you drool even just a little bit– this city is full of amazing food, and we can't wait to go back and eat even more!

Travel Tips

Monday, September 4, 2017

You might think we've been on vacation since we left for LA, and trust us, we wish we were, but alas, we've gotten back to work and forgot to post about that grand adventure until now. First off, we're talking travel tips– what to do, what not to do, what to think about and how to to react when things don't exactly go as planned (face it, travel is never going to go just as you planned it...)


Tip #1: Parking. It's normally a hassle in our everyday lives, then we start talking airport parking? Forget it. Or not! We always park with a third-party, off-site parking company like Winner. For a discounted daily rate, you can park your car at their lot, and a drive will take you to the airport in your own car, drop you off, and pick you up when you get back from your trip. Can it get any easier than that?!

Tip #2: On the topic of cars... if you're planning on going to LA, you're going to need a rental car. For sure. The public transportation there isn't as widespread as it is in cities like Philly and New York, so be prepared to drive a lot. Many airports offer an on-site, or nearby car rental option and shuttles to get you where you need to go.


While we could have opted for the flashy upgrade to a new Mustang, we kept our cool and drove this little Chevy all around town– stunna's some might say.

Tip #3: Airport 101, we're talking all things security, how to pack and what to pack. There are tons of travel blogs, packing lists and recommendations out there, but here's the low-down...

1) Stick to a carry on and personal item if you're traveling for a short amount of time. It saves you money and the headache of waiting for your checked bags (if they've even made it to your destination). 


We choose to travel with our Atlas Supply Co. backpacks because they're OH SO STYLISH, durable, and they have compartments to hold pretty much everything you need to travel with. Now they come in leather and a heavy-duty canvas!

2) Bring a jacket or sweater. You might sweat running to your terminal, but once you get on that plane, I swear the temperature drops like 10 degrees. 

3) Bring snacks and an empty water bottle, cause airport food is PRICY. (Or just save some bacon from your lunch for the plane ride home– see 2 photos below...)

4) Most planes offer wifi at a small fee, but if you're chea-- I mean, thrifty like us, bring a Sudoku book, a fully loaded iPod, sketchbook, deck of cards, something to entertain yourself for your flight. Nothing's worse than having nothing to do, staring at the balding man in the seat in front of you... 


Whether you're a nervous plane rider or not, cocktails are always a good idea. These Carry on Cocktail Kits from W&P Design are the perfect carry-on and they make great gifts for just about anyone. We opted for the classic Moscow Mule kits, and sometimes, just sometimes the airplane stewardesses will give you (multiple) servings of free alcohol... #blessed.


We're *great on planes, can't you tell?

Tip #4: Lodging. This is the age of Airbnb, people– hotels are too freaking expensive! We opted for an Airbnb in the heart of one of LA's little neighborhoods, Silver Lake to get a little different experience. Staying downtown in the midst of a city is great, but there's a lot you miss when you're confined to one area. Also having a rental car helped us to explore beyond our house.


We actually had a shared house with other guests, but had our own little room– Ikea galore! It was the perfect spot to relax and rest up after a long day of sightseeing and adventuring.


Also this backyard area was a major bonus– complete with a hammock!

Traveling doesn't have to be stressful, unless you end up waiting 1.5hrs in line for your rental car, but that's LAX for ya! You'll need a whole lot of patience, excitement and flexibility when traveling anywhere, and if you've got that, you're set to go!

BON VOYAGE, FRIENDS.

RAINY ROFO

Sunday, May 7, 2017

Hello friends! It's been far too long since we last posted in February, but we have been keeping ourselves very occupied... A has been busy designing, traveling and working working working in cool places like Miami and Nashville while Ray has been working, taking care of her fur baby and still getting to know the area she moved to last fall, like discovering a delicious donut shop and the coolest brewery right up the street from where she lives. We love having weekend adventures and this day was filled with brunch, music, plants, beer and of course, Chick-fil-A. Also in case you're wondering, RoFo is an endearing, slang term for Ray's new town Royersford, but we're cool so we call it RoFo now.

Walked to brunch and got a nice surprise rain shower on our way back... Hotdog.


Once we dried off and decided to drive instead of take our chances with the weather, we headed to Ott's... a plant lovers dream.

They have all the plants imaginable... for real.
Yeah, that's an indoor waterfall.

We left with cacti twins! YAY!

We love plants and this place so much that we thought up a plan to host an event called "Sleeping with the plants" so that we could spend the whole night in this greenhouse. Sweet idea right? Please don't steal our idea, cause we're going to make it happen one day and we want to invite you, so stay tuned. In the meantime, go to Ott's if you're in the Bucks Co. or Philly area, it's definitely a morning or afternoon of plant-filled fun (and a test of self-control)

Make sure you're following @rayandablog on Instagram for more adventures like this one, and we'll have plenty more to come!

#plantladies4lyfe

DIY (NOT YOUR TYPICAL) FELT BANNER

Sunday, February 5, 2017

So you may be thinking, 'oh look, another felt banner.' Yes, this is a felt banner DIY, but it's next level. Why commit to one phrase when you can customize it to whatever you want whenever you want?! You may already have some of these supplies in your craft corner, but if not grab ten bucks and head to pick them up! In honor of February we used some cheesy love phrases.


M A T E R I A L S

+ Thick piece of felt 
+ Wooden dowel 
+ Felt letters
+ Sticky back Velcro 
+ Glue gun
+ Scissors 
+ Twine, ribbon or yarn to hang the banner


^ can you spot the kitty paw?

S T E P   O N E 

Cut the bottom corners of the felt banner making a point in the center of the felt. You may want to grab a ruler or something with a straight edge to help make this even.

S T E P   T W O

Saw or snap the wooden dowel so that it is sticking out a bit further than the width of the felt banner. Flip the felt banner over and roll the wooden dowel into the felt. Use your glue gun to secure the felt onto the dowel and hold down for about ten seconds.


S T E P   T H R E E

Using just the rough Velcro, begin to cut strips into squares to stick on the felt letters. The rough Velcro will stick to the felt banner while the softer strips of Velcro will not. Peel off the plastic on the back of the Velcro squares and stick onto the back corners of each felt letter.


S T E P   F O U R

Line up the letters onto your felt banner, flip over and press down firmly so the Velcro sticks onto the felt.


Switch up the felt banner as often as you want for celebrations, holidays, countdowns and more! The possibilities are endless. Share your banners on Instagram and tag @rayandablog - we would love to see them!

#morebangforyourbuck

Atlas Supply Co. Backpack Review

Sunday, January 29, 2017

We have some exciting product review news for you this week (we ain't Forbes, but we speak the truth). Working full-time and adventuring on the weekends (#doitfortheblog) is always a production, and we don't travel lightly– between a 15" macbook, DSLR camera, some notebooks, and of course the necessary wallets and phones, it gets hard to juggle it all. Enter Atlas Supply Co, the beautiful solution to the modern day freelancer's problems.


Jamie and Stephen of Salt & Ember design studio had the idea to put a little more ease of access into freelancer's lives with a bag that carried it all. Being designers, photographers and small business owners, they put their brains together and came up with a design plan for the first Atlas Supply Co. backpack.


*Designerd tangent: Look. At. This. Branding. It's so cohesive and cool, I'd buy anything if they put that tag on it (only kind of kidding...) These days branding is half the finished product, so it's gotta be good, and I think it's safe to say this husband and wife dynamic design duo nailed it.


This baby is 110% gorgeous– I mean, look at that smoooooth, shiny leather... We jumped at the chance to try and review this product, and are super excited to tell you about it!


The Entrepreneur Bag comes in Black, Walnut (what I got!) and Copper, they're all perfect it was hard to make a decision! Each bag comes with a super cohesively branded bag, tag and tin of leather sealer wax. Before you even get to the real bag, the packing is a surprise in itself!


Just look at that walnut beaut! 


They even branded the bag with their killer little logo!


My favorite feature of this backpack is probably the laptop zip pocket in the back, which fits any size laptop up to 15-inch. So convenient, especially for travel when you have to pop it in and out. 

Overall, this backpack get's a 10/10– can't wait to keep using it!