Showing posts with label 2016. Show all posts

DIY: Plywood Letterboard

Friday, January 13, 2017


You've all seen the trendy letter boards and light boards from Letterfolk and Heidi Swapp, and don't get us wrong, they're pretty awesome. I mean, they're what inspired us to create a hybrid of the two!


You'll also need some transparency sheets, sandpaper and a pair of scissors.

Step 1. Take your dowels, and measure them against your plywood board, marking the width with a pencil. 

Step 2. Cut the dowels with a handsaw or chop saw (or a very, very industrial pair of clippers). Sand the ends lightly until smooth. 

Step 3. Using some E6000 glue, glue your dowels onto the board, spacing equally depending on how many lines of text you want. 

Step 4. Paint your plywood board and dowels white (or whatever color your little hear desires) and let that dry. Do a second or third coat if you think it needs it.

Step 5. Start by cutting your transparency sheets into strips that fit in between your dowels. Then place the letters onto the strips you just cut, leaving enough space in between letters for equal spacing.


Step 6. Once you have all the letters cut out, time to play!


Now it's time to think of some snarky (or cute) quotes, and put 'em on display!

We'd love to see your own take on this DIY, so if you make it, share it! Tag your projects with #rayandablog

#sayitwithwords

Last Minute Gift Guide

Wednesday, December 21, 2016

Christmas is this weekend and yes, we're still gathering up presents (don't judge us, we know you're doing the same thing). For whatever reason, Christmas seemed to sneak up on us this year even more than usual. We love to be personable with our giving, so we've put together a little gift guide if you're looking for last minute gifts. Be sure to stop by your local shops to support the small businesses in your town! Plus, you'll find unique things you won't find at a big retailer! We present you with...


RAYS'S PICKS


A'S PICKS


There you have it people– our top picks (we might be hoping to see some of these things in our own stockings, and we'll never object to a gift). Happy shopping!

Have a favorite last-minute gift? We'd love to hear about it! Share it below, and make sure you're tagging us with #rayandablog on instagram!

#giftitwell

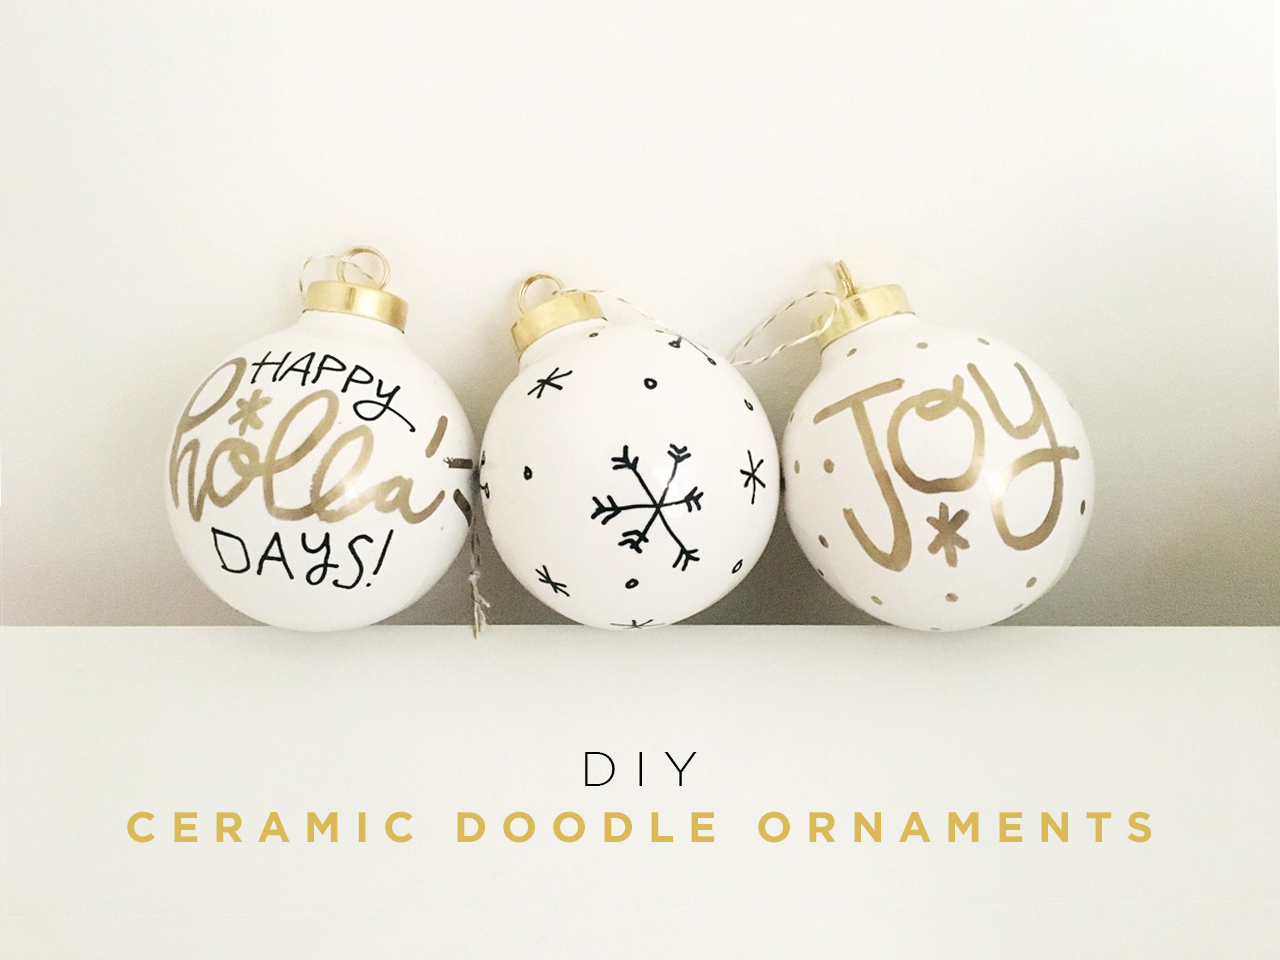
DIY CERAMIC DOODLE ORNAMENTS

Wednesday, December 14, 2016


I don't know about you, but we've been making homemade ornaments since we were in grade school, and let's face it– they weren't all Instagram worthy to put it lightly. Now that we're older and can hold a marker the correct way, it's time to revisit the handmade ornament. 


All you'll need for this one is some paint pens and baker's twine. Doodle a festive word, some classic snowflakes, or maybe even a sassy holiday phrase. The possibilities are endless, and these ornaments are super cheap so you don't have to limit your imagination!


And it wouldn't be a DIY without Butternut, who turns out to be quite the natural model. Not currently taking any gigs, but one day he'll make it big. Until then, happy holidays, and happy crafting!

We'd love to see your creations– share them on Instagram and tag us @rayandablog

#doodlealltheway

DIY CHRISTMAS COUNTDOWN

Sunday, December 4, 2016

To start off the month of December we made this little Christmas countdown for your home! All the supplies can be found at your local craft store and you may already have most of them in your craft drawers. We stood gushing over this adorable little wooden house smack in the middle of AC Moore, we were that excited. You can even customize the little house any way you want! We decided to keep the house in its nat-ur-al wooden state.


M A T E R I A L S

+ Wood house
+ Two wood blocks
+ Spray paint
+ Paint pen
+ Baker's twine 
+ Scrapbook paper
+ Scissors


S T E P   O N E

Spray paint the blocks and let dry in between coats. Apply two or three coats. Let fully dry.

S T E P   T W O

Start by cutting out triangles from scrapbook paper and space it out to say "Days til Christmas." Write a letter on each triangle and glue onto the baker's twine. Let dry. And let it be know– mini is better!

S T E P   T H R E E

Glue the mini garlands onto the wooden house. (See? It's adorable.)

S T E P   F O U R

After the blocks are fully dry, using the paint pen write on the numbers "0, 1, 2, 3, 4, 5" on the sides of one block and "0, 1, 2, 6, 7, 8" onto the sides of the second block.


Set the blocks into the wooden house and you have yourself a Christmas countdown to display! We would love to see how you customize your own countdown. Tag us on Instagram @rayandablog

Keep an eye out for more Christmas crafts coming your way every week! We're getting realllll crafty this month, get ready...

#christmascountdown

LAST MINUTE HALLOWEEN COSTUMES

Thursday, October 27, 2016

If you procrastinated on your Halloween costume this year, welcome to the club! We always have good intentions of planning ahead a wicked sweet costume but seem to lose track of time. Below are DIY costumes that you can put together at the last minute and no one will ever know!

HOTDOG

Grab a tan dress, some felt and a glue gun


via Studio DIY


MIME

You probably have most of this in your closet!


via Brit + Co


SNAPCHAT FILTER

Cardstock, scissors, a glue gun and ribbon is all you need!


A colored dress + white fabric and black letter stickers


Complete with banana turban


If all else fails, grab a sheet, cut some holes for your eyes and be a ghost like Charlie Brown


#diyyourhalloween


DIY Mini Pumpkins (and a giveaway!)

Saturday, October 22, 2016


It's just something about this time of year that makes us want to buy all the pumpkins. During October it's easy to spend more money on said pumpkins than on food. It's not sad– it's for the blog folks...

Our mission– take all the cool pinned ideas we've seen and put our own twist on them! And let's face it... no one really wants to dump out pumpkin guts, so these are all no cutting-no gluing-sewing-no crying-required.


A little bit of spray paint goes a long way. That's the easiest way to transform your pumpkin from mehhh to glam. Stick on some letter stickers, and you've reached a whole new level my friend. 

Sharpies are among the best inventions ever known to mankind. With a little imagination and a steady hand, (hold on the coffee before you do these, we learned the hard way) you'll have a killer customized pumpkin in no time at all!

We're also hosting a little giveaway– 3 lucky winners will each receive one of these customized pumpkins from yours truly, but you have to...

1. Follow us on Instagram (@rayandablog)
2. Comment on our post (this is where we'll pull your name!) 
3. Like us on Facebook! And we love your comments, so send them our way!

Got it? We can't wait to see your pumpkin makeovers, and select our winners! You have until next Wednesday, October 26 to enter!

#paintyopumpkin

OCTOBER IS HERE

Saturday, October 8, 2016

It's that time of the year again where our weekends consist of comfy sweaters, warm drinks and pumpkin everything. With the rare occurrence of Ray & A getting together lately, it was great to catch up eating brunch at our favorite hometown cafe and picking up some apples, gourds and of course fresh baked goods at our local farm. We're sharing some of our favorite October activities below!


A P P L E   P I C K I N G

Going to pick our own apples at an orchard definitely beats waxy apples at a grocery store any day. It's even cheaper as well! We're all about fresh and healthy, besides the occasional Chick-fil-A, which is essential to our diet.


C A M P F I R E S

Cool, fall nights are perfect for sitting by the campfire under the stars. Campfires are also the best time to stuff our faces with s'mores and other roasted goodies (we're healthy, remember?) Going to bed with that smoky smell signifies a great night by the fire.


R E A D I N G

Since weekends are our lounge days we're ready to dig into new reads and dive into another world. Ray highly recommends The Fault in Our Stars and Looking for Alaska, obviously a John Green fan. A wishes she had books to rave about, but doesn't read as much as a cultured adult should, so help her out and send some recommendations her way.


K N I T T I N G

Yarn, yarn and more yarn. Tis the season for knitting and crocheting! A actually just did a mega yarn haul at JoAnn and is ready for some Netflix and knit. If you're looking for some cool patterns, Pinterest is our go to for inspiration and how-to's!


What are your favorite fall activities? Share below or comment on our Instagram @rayandablog

#haveagourdfall

Fall Picks

Wednesday, September 7, 2016


I hope this post finds you sipping some iced coffee and not a PSL (pumpkin spice latte, for you coffee amateurs out there), but we admit, we’re as excited for fall as the next person in line behind you at Starbucks.


Summer was kind of a blur between work, weekend outings, and planning for Ray’s wedding (which is in THREE DAYS!!!) Though we’re still trying to squeeze out the last few moments of summer, we’re already looking forward to some fun fall activities. We’ll share some of our top picks with you:


  1. Apple picking! Pumpkins get all the credit this season, but don’t forget about the apples! Apple picking is just as fun and rewarding as rolling that big ‘ol pumpkin down a hill, and many local farms and orchards have festivals this time of season. Last year we headed to Tabora Farms to get our apple fix, and we definitely plan on heading back this year!

  2. Fall Mountain Getaway We do love a good city adventure, but we’re country girls through-and-through. There’s nothing quite like being in the mountains during the fall season, surrounded by millions of shades of red and orange. Oh yeah, and campfires with lots of s’mores!

  3. PSE (Pumpkin Spice Everything) I mean, we can’t resist, so might as well give in to the popular culture on this one. Grandma’s pumpkin pie will always beat that latte, so no worries Grandma.

  4. Get our your Knitting Needles! Let’s face it, all season is knitting season, but there’s something about knitting under your cozy blanket (that you knit last year) with a cup of hot tea while streaming Netflix. Join a knitting circle, find some new patterns, and indulge on some new yarn, because ‘tis the season!

  5. Harry Potter Festival (right here in Philly!) Septa will be transforming into the Hogwarts Express to take guests into the Chestnut Hill section of Philly for a weekend of Potter-themed festivities, including a Quidditch tournament.

To get you in the spirit of autumn, here's a free printable for you, or set is as your wallpaper. Did any of your top picks make our list? Got some more? We’d love to hear them– comment below and let us know how you’ll be kicking off your fall season!

#fallingforfall

What We're Into: 8/4

Thursday, August 4, 2016


If you look at the post before this you're probably thinking, “You haven't posted anything in so long! WHAT THE HECK!?” Yeah, we’re thinking the same thing. We can't believe it's August already and summer seems to be less fun as an adult because we have to work and have responsibilities and everything, ya know? Anyways, Ray has been super busy planning her wedding that is in September and working on moving into an apartment. While A has been helping her along the way as a bridesmaid and doing her duties of designing all things paper and helping prep the pre-wedding fun. We haven’t forgotten about the blogging world! Here are some super cool things we can't seem to get our minds off of...

Cat videos. Because just when you think you've seen them all, you haven't. This one in particular is the bomb.

Thankfully glasses are always in style thanks to Warby Parker, now that both of us are now “4-eyes.” These sunnies have us dreaming of a forever summer!

Speaking of cats… Philly opened it’s second cat cafe this year, called Kawaii Kitty Cafe in Queen Village, and it’s PAW-some (#sorrynotsorry for the pun) Complete with a full coffee bar, delicious pastries, and of course lots of furry friends to cuddle up with while you sip away! You can also pick up some of A’s greeting cards (cat edition) in the shop!

Target ain’t just for suburban moms! Center City opened a Target Express last week, and we have yet to check it out, but nonetheless excited to see that big red bullseye grace the city streets.

Let’s face it– everyone’s a plant lady these days, so why not use them to decorate your room/apartment/house? Monica over at East Coast Creative has a fun little DIY plant cozy that’s instant decor to jazz up your house and your plants!

Stick around for more fun posts in the near future!

#bloggersforever

DIY: Air Dry Clay Ceramics

Monday, June 13, 2016

Desk accessories have really been trending lately, and we can't get enough of them! They're practical, useful, and super cute! This week we bought some air dry clay, and tried our hand at some desk accessories of our own– a pencil holder and a mini dish. Here's what you'll need to make this craft:


MATERIALS:
+ Air Dry Clay
+ Clear Gloss Sealant Spray (optional, but if you want a sleek, glossy look, this stuff is for you!)
+ Clay tools or a knife
+ Circular Glass
+ Straw or Pencil
+ Clay Roller to flatten the clay (OR a spray can does the job!)
+ Gold Paint Pen (optional, but adds a little something to the final product!)


PENCIL CUP

Step 1: Cut a piece of air dry clay, enough for however many pieces you're making. We used about half of the block to make our pencil cup and mini dish. Make sure you seal up the rest of the package if you don't use all the clay– if not sealed properly, it will dry out fast! 

Step 2: Cut out a circular piece of clay for the bottom of your pencil cup. You'll want to make sure the walls of your cup holder fit nicely around this circle without too much gap. 


Step 3: Roll out the wall part of your pencil cup with your roller (or spray can!) Don't roll the clay so thin that it sticks to your working surface, but you also don't want them so thick that it's hard to attach to the base of the cup. About 1/4" - 1/2" thickness is good. 


Step 4: Trim the top, bottom and sides of your clay slab so you have a nice rectangle to then attach to the circular clay base. Then punch some holes in the slab for a small decorative touch, or leave it plain- it's up to you!


Step 5: Drape your rectangular slab of clay around your clay base, and merge these two pieces together securely at the bottom. With a clay tool or knife, make tiny slashes across the pieces, then gently smooth over these dashes to join seamlessly. 

Step 6: Once you have joined the base to the sides, you can smooth out the rest of the pencil cup around the sides and the top rim. Remember, handmade is beautiful, so don't sweat the imperfections!


Step 7: If you're feeling fancy, or think the white is too white, take a gold paint pen and line the rims of your cup and dish. If you want even more color, don't be afraid to grab some paint and add a pop of color to your workspace!


MINI DISH

Step 1: We made our mini dish from the excess clay we cut off our pencil cup, so it doesn't take much! Roll that out into a smooth, round ball of clay.

Step 2: Gently press your thumb into the center of the clay ball to start forming the inner part of the dish. Keep smoothing and pushing against the sides until you get something that looks like a little dish!

Step 3: Add a touch of color if you want, or keep it plain and simple! These dishes make wonderful little homes for air plants (we can't get enough of them!)

This isn't your typical fine-crafted ceramics project, but it is a fun way to get your hands dirty and make some nice additions to your desk set-up!

#makeitmonday

BACK TO THE CITY PART II

Sunday, May 22, 2016


Get it? While the rain has been sticking around for literally weeks, it didn't stop us from going out on another Philly adventure. And this time we went exploring along with two others– A's sister, Kelsey, and our dear friend, Leanne. 


FIRST STOP 

Of course we needed to fuel our bodies for the day, so we stopped by Little Spoon Cafe for our brunching needs. Mason jars, windowsill plants, cheery printed wallpaper, and fine food are just a few of our favorite things about this place! The menu alone has such a unique variety of foods that we didn't even know existed, like ramps which are apparently a 'mild green vegetable,' kinda like a green onion... go figure. They definitely know what they're doing here because it was a delicious choice. 


SECOND STOP

What's a day in Philly without stopping by La Colombe each and every time? But this time we were able to give our friend Leanne the experience of her first draft latte, and she loved it (of course.) There's really nothing quite like the smooth layer of foam, crunchy ice chunks and fresh espresso. Insanely refreshing.

THIRD STOP

West Elm. The visuals in this place are literally jaw dropping each and every time. From the room accents to the pillows to the furniture pieces we were already planning our future, non existent home as if we could buy everything in the store for it. One day my friends, one day...

FOURTH STOP

The Blick store. Ray had never been in here and boy was she missing out all these years. For all your art supply needs, and we mean any, this is the place to go. Walls of different kinds of pen is the place we want to be! Let's just say we spent a good chunk here gawking at the variety of supplies Blick carries, and definitely didn't come out empty-handed.

FIFTH STOP

The perfect stop for accomplishing any projects in a chill atmosphere that has two floors for space with drinks and eating options, Chapterhouse Cafe. Our main goal for the day was to assemble all of Ray's wedding invites so they're all ready to send out. This was the perfect way to catch up with each other, share some crazy stories, and get organized. We even had a little visit from the cafe's dog friend. We highly recommend this place to get some serious work done, or if you just want a chill spot to catch up with a friend.

Until next time, Phily. We're thankful for friends that stick together and always make time for each other even when life is crazy!

#galpals 

DIY: Chalkboard Paint Clipboards

Wednesday, April 13, 2016


A few months ago we did a contributor post for Monica at East Coast Creative, and we're excited to share it with you now! Monica is a super talented designer, blogger, and supermom, and you'll be sure to find some awesome DIYs and home decorating inspiration from her blog.

This quick and easy DIY is the perfect combination of organization meets cute home office decor! Heck, this can even be your new after work de-stressor, so doodle away!


Easiest calendar ever, and fully customizable if we do say so ourselves.

Here’s what you’ll need to make your very own chalk paint clipboard!


MATERIALS: Clipboard | Chalk paint | Brush | Metallic paint/paint market (optional) | Chalk
Begin by painting the entire front of the clipboard with the chalk paint. Be sure to get underneath the clip! Allow each coat to dry for about 20 min before doodling. Two or three coats make for a strong, thick surface to draw on! Once the board is dry, let your imagination fly! Use this clipboard as a calendar, to-do list, or a place to store your daily reminders!


We painted the sides and back of the clipboard metallic gold for that popular luxe look everyone seems to be going for these days… 


Get inspired with a motivational quote!


Use your clipboard as a to-do list, guaranteed you won’t forget to get milk this way…
Clipboards already have hardware attached, so your project is ready to be hung, just tack up a nail, and you’ve got yourself a new piece of wall art!

So what are you waiting for? Go grab a clipboard and start painting now!
Use #rayandablog so we can see your creations! We’d love to see your take on this DIY!